
16 Paper Crafts for Kids: Things to Make, Fold & Play With
Paper crafts for kids are some of the easiest projects to start at home because the supplies are simple and the finished pieces can become toys, decorations, cards, bookmarks, or pretend-play props.
This collection includes 16 paper crafts for kids with clear, practical steps using materials such as construction paper, cardstock, paper plates, tissue paper, and cardboard. The ideas range from quick folds to projects children can keep playing with after the craft is finished.
If you want to browse more paper-based ideas over time, visit our Paper Crafts hub. For a broader mix of materials, explore the main Kids Crafts section.
First, Choose Your Paper
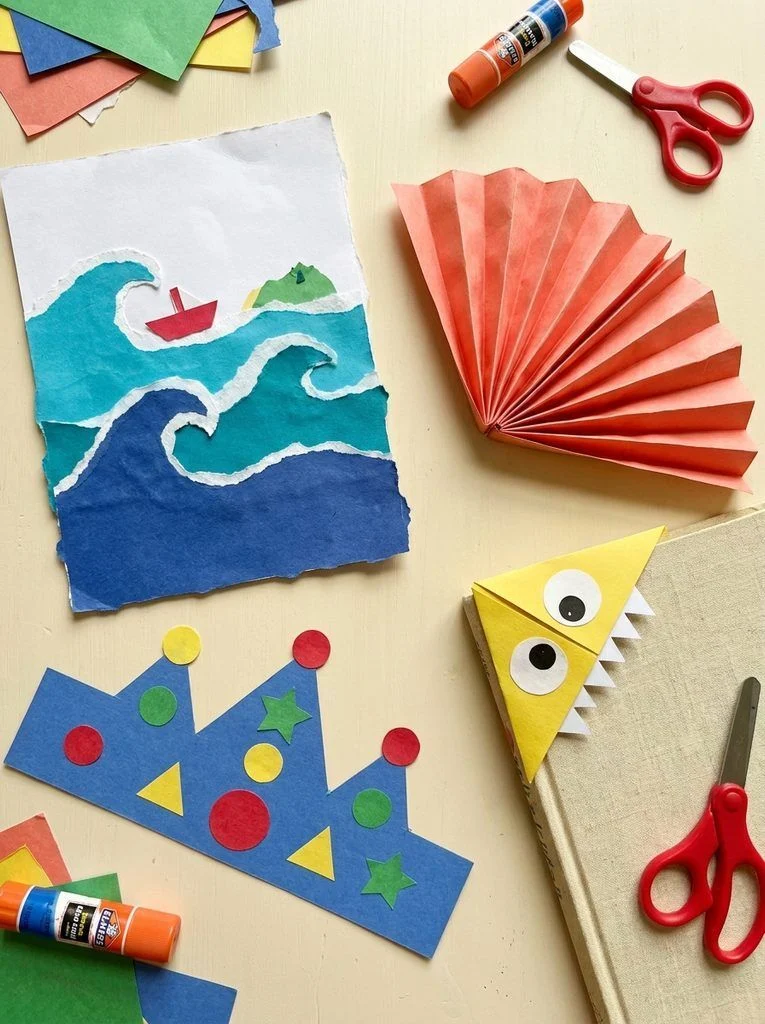
You do not need to buy a full craft kit. Start with paper, a glue stick, a pencil, markers, and child-appropriate scissors. Tape helps with projects that need an immediate hold. A few pieces of cardstock are useful for backgrounds and standing shapes.
| Paper already in your cupboard | Where it works best |
|---|---|
| Printer paper | Folding, fans, bookmarks, and drawing your own patterns |
| Colored construction paper | Torn pictures, cut shapes, flowers, and paper chains |
| Lightweight cardstock | Collage backgrounds, crowns, and pop-up cards |
| Clean wrapping-paper offcuts | Patterns for collages or decoration on sturdier paper |
| Ordinary tissue paper | Lightweight collage and crumpled textures |
| Bleeding art tissue | The water-transfer painting in project 4 |
For younger makers: Prepare large pieces and offer help with scissors, small decorations, and tricky folds. Choose age-appropriate craft supplies and supervise according to the child and the activity. Use drawn eyes instead of loose plastic ones. A child who prefers tearing or arranging can join in without cutting independently.
Which Project Fits Today?
- No scissors available? Start with the torn-paper garden or ocean picture.
- Want to avoid glue? Use a pre-cut square for the folded dog face or corner bookmark.
- Have a pile of colored scraps? Build the shape town or decorate the crown.
- Want something to play with afterward? Choose the puppet, paper snake, or little theater.
- Ready for a more careful challenge? Try weaving or the pop-up card.
Start with Scraps: Pictures Without Perfect Edges
These four projects leave room for experimentation. Children can rearrange the pieces before anything is attached, and the finished work does not need to match a sample.
1. A Torn-Paper Pocket Garden
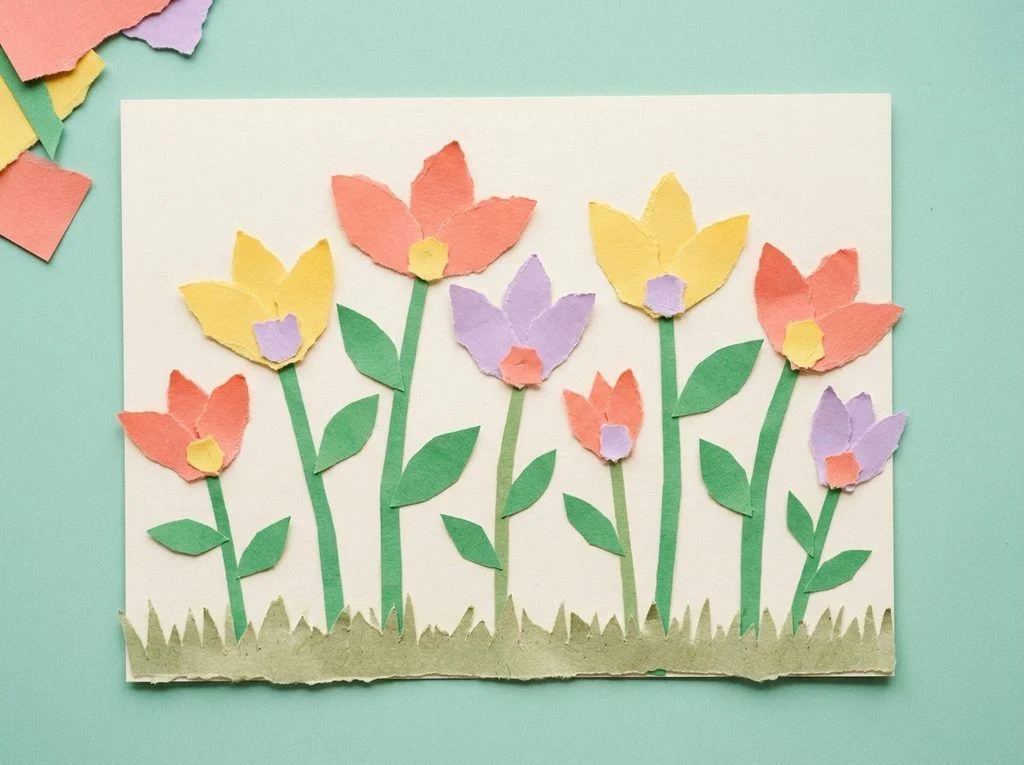
Give each child a piece of cardstock and a small pile of green and brightly colored paper. Tear narrow green pieces for stems, rounded scraps for petals, and larger shapes for leaves. There is no need to draw cutting lines.
Arrange a few tall flowers at the back of the picture and shorter ones near the bottom. Glue the stems first, then overlap the petal pieces around a small center. Finish with a strip of torn green paper across the lower edge for grass.
Leave some background showing between the plants. That space makes individual flowers easier to see and gives children somewhere to add a beetle, snail, or imaginary garden visitor with a marker.
For a child who tires of tearing, offer ready-made scraps and let arranging be their main job.
2. An Ocean Made from Ragged Paper Waves
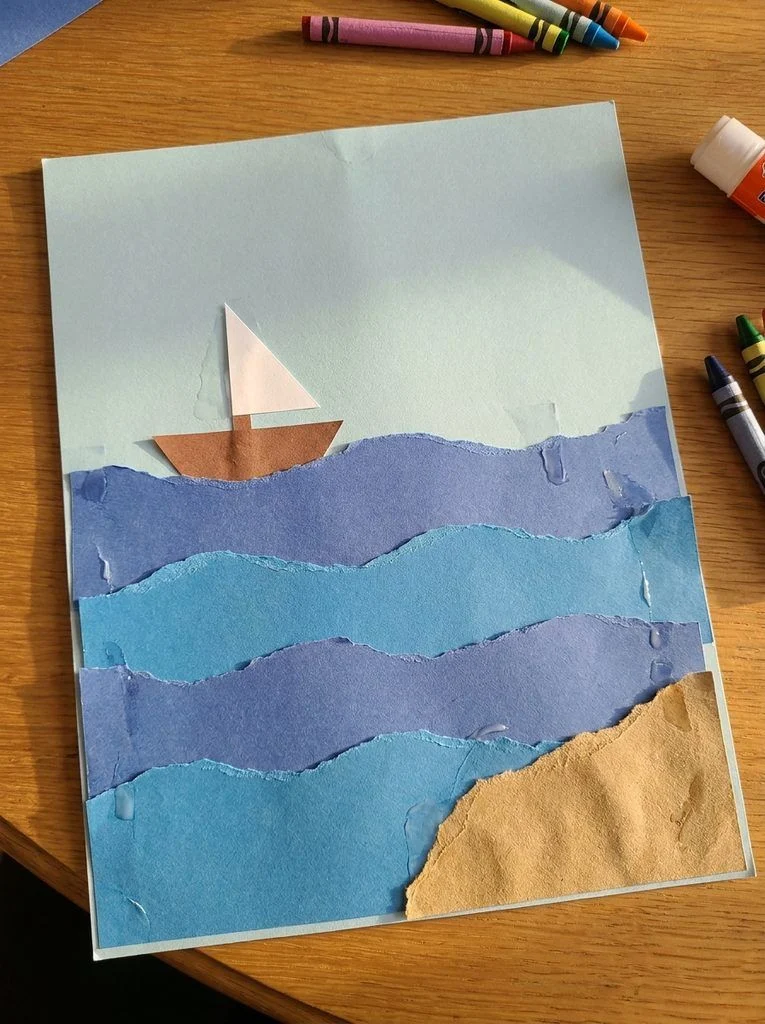
Choose three or four shades of blue. Tear wide strips roughly the width of your background card, giving one long edge of each strip an uneven wave shape.
Start near the top and glue the first strip down. Add the next below it, overlapping the straight lower edge of the first. Continue toward the bottom so the torn edges remain visible like layers of water.
Tear a sandy-colored piece for a beach or add a small paper boat above the waves. Children can also draw fish before gluing the layers, leaving part of a fish peeking from behind a wave.
A useful experiment: Move one dark-blue strip between two pale ones before gluing. Ask your child which arrangement makes the sea look stormy, quiet, or deep. There is no correct answer to match.
3. Build a Tiny Town from Shapes
This is a good project for the odd rectangles and triangles left from other crafts. Spread the pieces out before deciding what they will become.
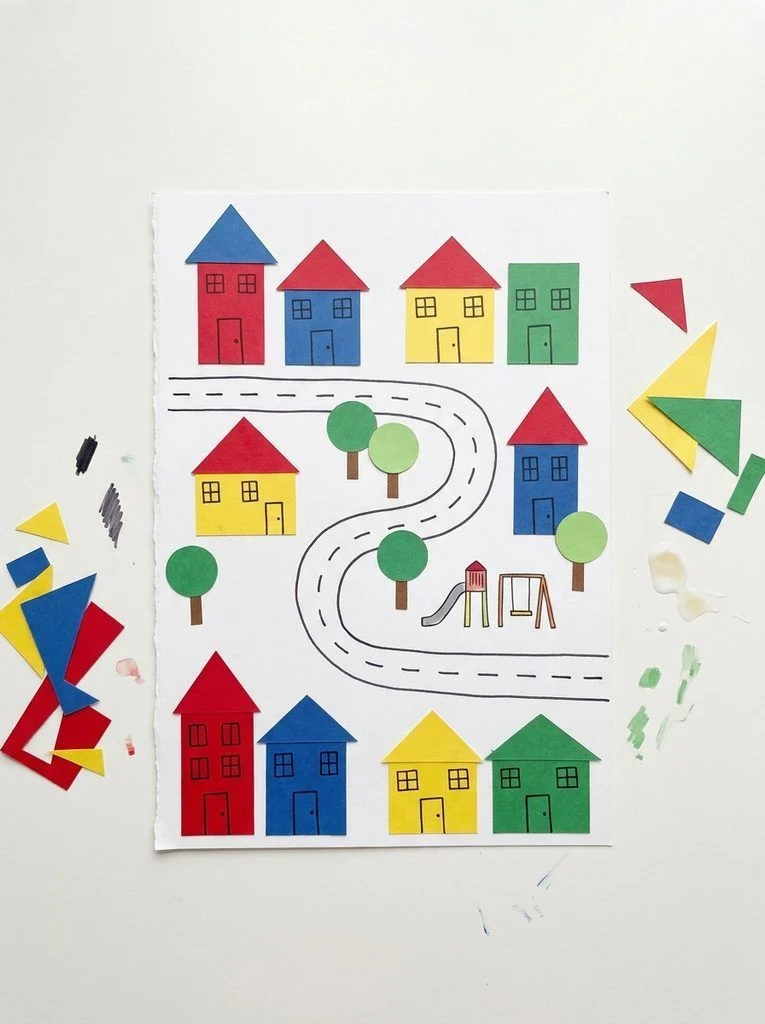
A rectangle and a triangle make a house. Three narrow rectangles can become apartment buildings. A large circle might be a tree, a fountain, or the sun. Let your child move the pieces around on a broad sheet of paper, then glue the larger shapes first.
Add doors, windows, paths, and road markings with a marker instead of cutting dozens of tiny pieces. Older children can include a library, bakery, playground, or invented shop.
When the town is finished, use a finger to trace a route through it: “How would someone get from this house to the park?” The collage becomes a setting for stories rather than a picture that has to be put away immediately.
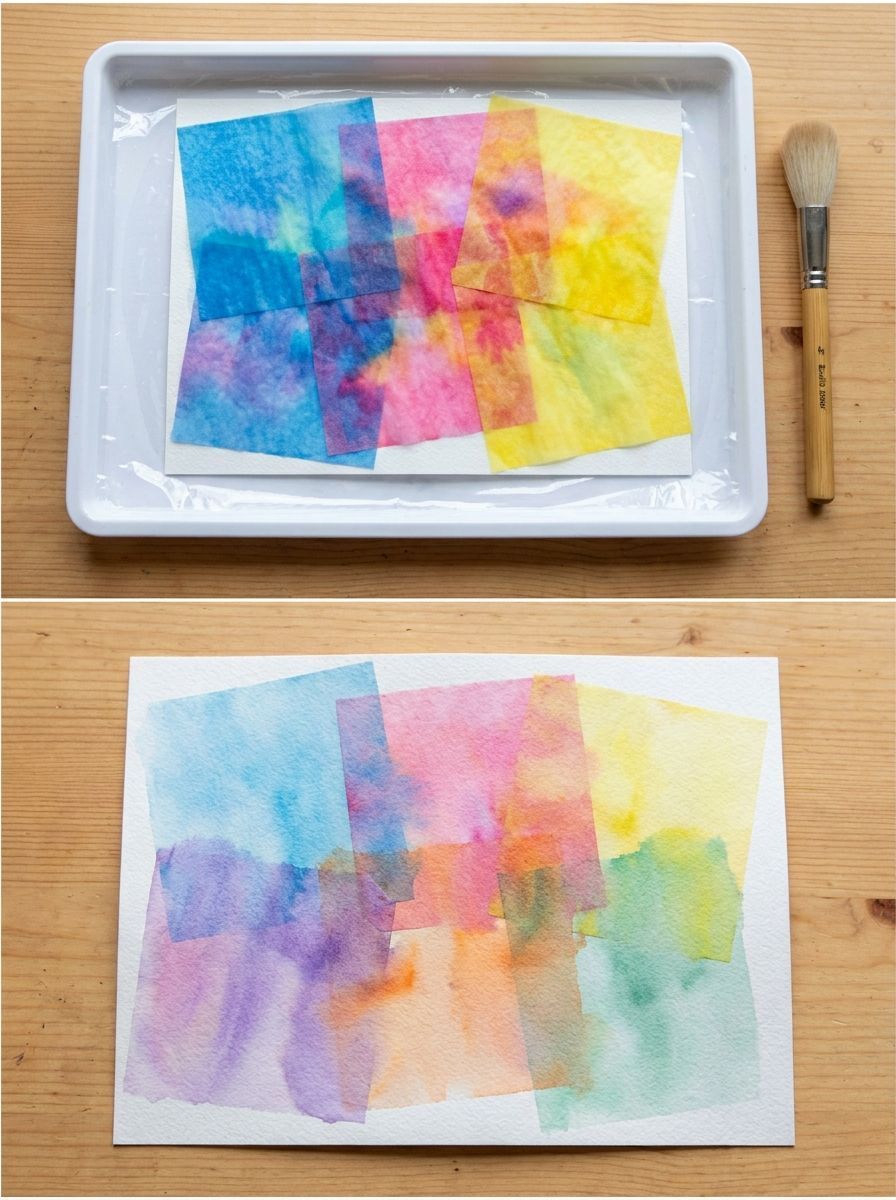
4. Tissue-Paper Color Transfer Cards
This project needs bleeding art tissue, which releases color when wet. Ordinary gift tissue may not transfer any color. Test one wet scrap on spare paper before setting up the whole activity.
Put a piece of watercolor paper on a protected tray. Arrange torn tissue pieces over it, slightly overlapping some edges. Use a soft brush to wet the pieces so they make contact with the paper underneath. The surface should be wet enough to transfer color, without a puddle covering the tray.
Leave the tissue in place while the color transfers, following any directions on its packaging. Let it dry, lift away the loose tissue, and allow the background to finish drying completely. Keep the damp colored tissue away from clothes and surfaces that could stain.
The finished sheet becomes a colorful background for a card, a bookmark, or a cut-paper silhouette. If your tissue does not bleed, save it for a glued collage instead.
Give a Sheet a New Shape
For folding projects, thin paper is easier to handle than thick construction paper. Show one fold at a time, and let children press the crease against the table before moving on.
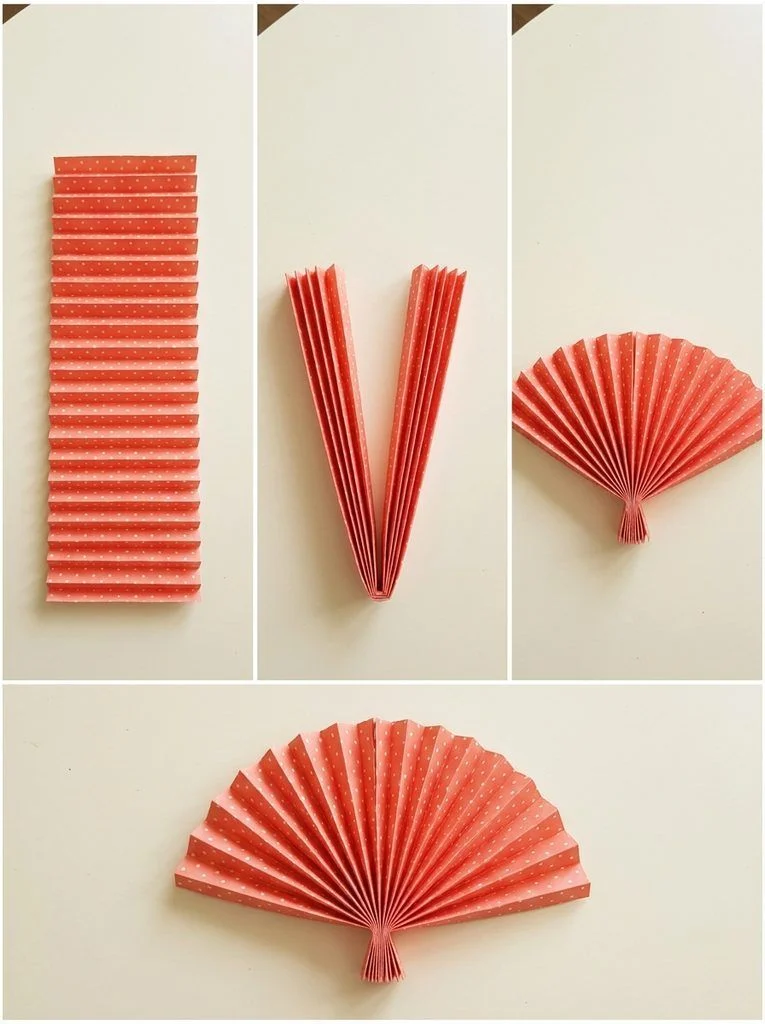
5. A Fold-and-Open Paper Fan
Use a rectangle of printer paper, roughly A5 size, and decorate it before folding. Broad stripes, dots, or large flowers will still show when the fan is pleated.
- Starting at a short edge, fold over a strip about 1–2 cm wide.
- Turn the paper over and fold back the same width. Repeat to make an accordion.
- Pinch the pleated bundle together and fold it in half across its length.
- Glue the two inner long edges together, holding them until they grip.
- Spread the outside edges apart to open a semicircle.
Keep the center fold pinched while the glue sets. If the fan opens unevenly, check whether the pleats are caught together before making new folds. No wooden handles are needed for this version.
6. A Folded Dog Face with Floppy Ears
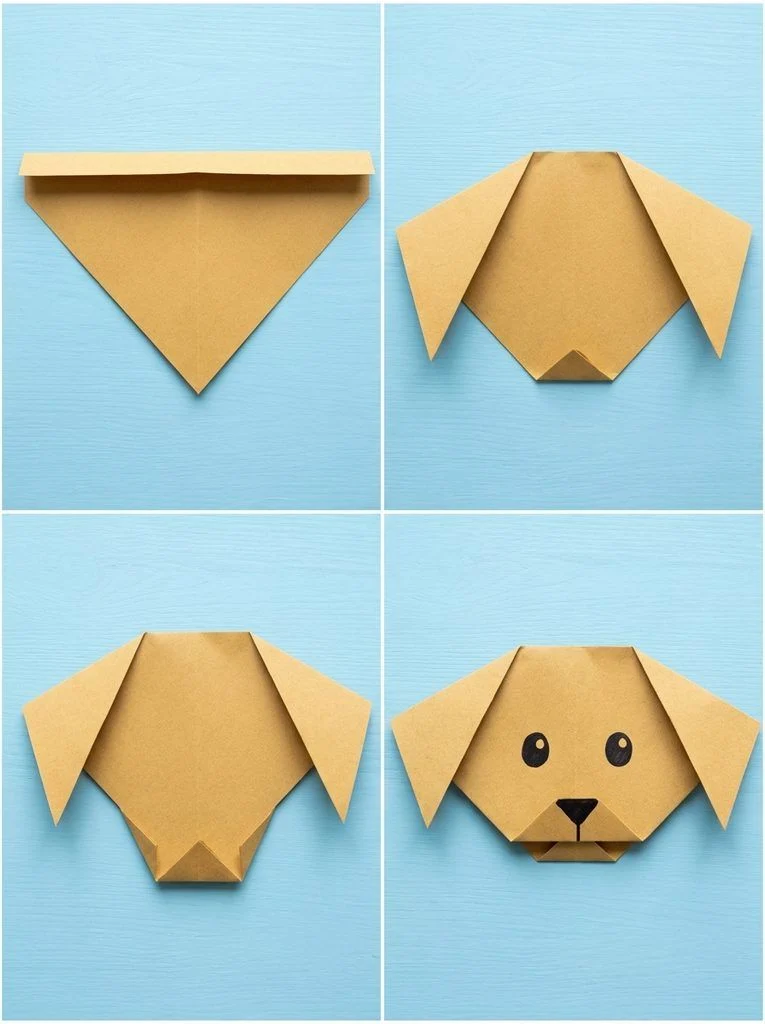
Start with a square about 15 cm across. If you only have a rectangle, an adult can trim it into a square first.
Fold the square diagonally into a triangle. Turn the triangle so its long folded edge is at the top and the opposite point faces down. Fold the two top corners downward to create floppy ears. Fold a small part of the bottom point upward to flatten the chin.
Draw two eyes and a nose. The ears do not have to match: one long ear and one short ear can give the dog a personality of its own.
A white square works well because children can add spots afterward. Make several faces with different expressions and use them to tell a story, or glue one onto a folded greeting card.
7. A Monster That Guards the Corner of a Book
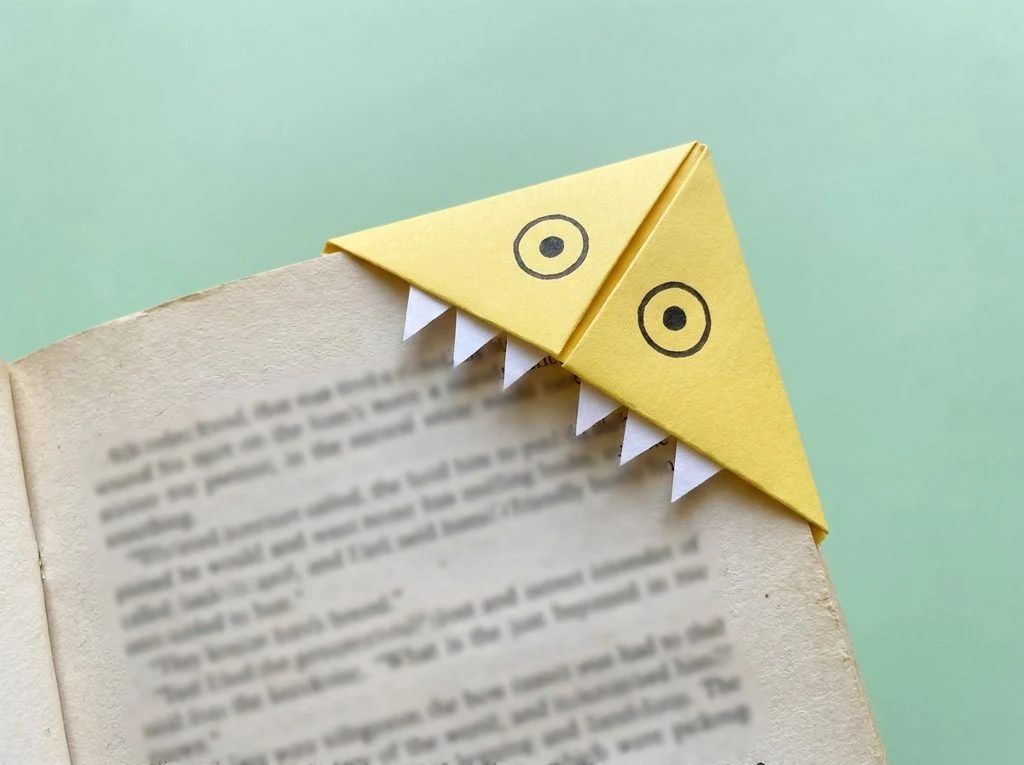
A corner bookmark needs a pocket that stays open. Use a 15 cm square of thin paper; stiff card makes the tucked layers harder to manage.
- Fold the square diagonally into a triangle, with the long edge at the bottom and the point at the top.
- Bring the left and right corners up to the top point. Crease, then unfold those two corners.
- Fold only the front layer of the top point down to the middle of the bottom edge.
- Bring each side corner upward again, then fold and tuck its tip into the pocket behind the folded-down front flap.
Decorate the outside with drawn eyes and small paper teeth along the pocket opening. Keep glue away from the pocket itself. Slide the bookmark over the corner of a page to check it works before adding more decorations.
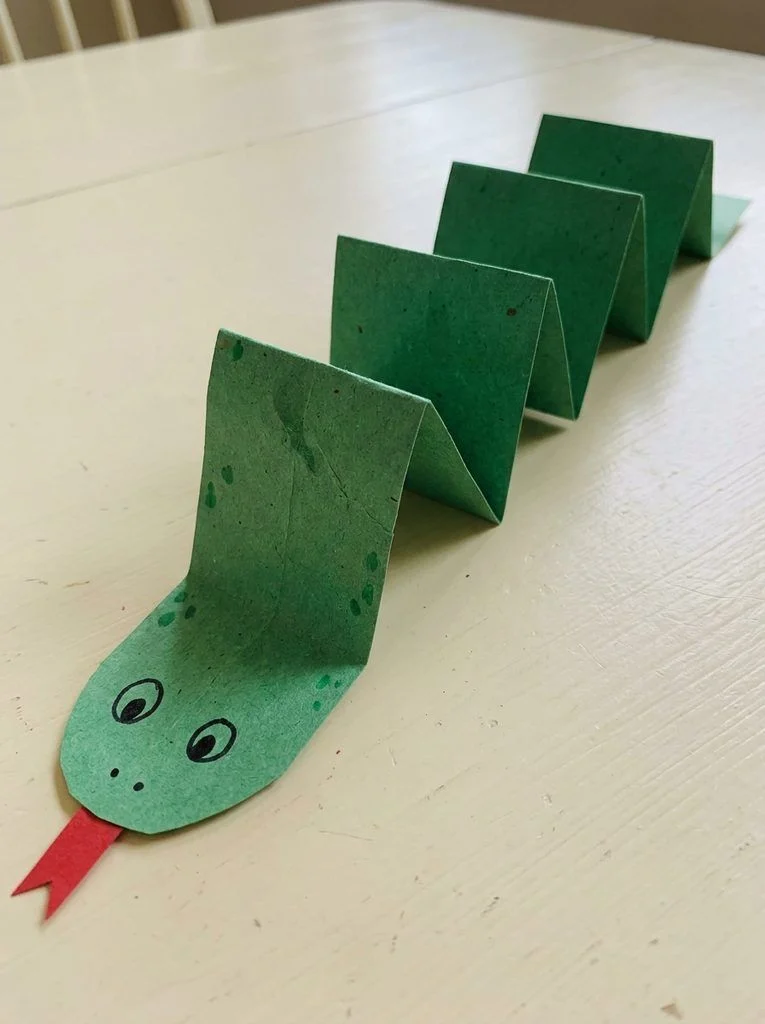
8. A Zigzag Snake with a Folded Body
Cut a strip about 4 cm wide from the long side of a sheet of colored paper. Decorate it with dots or stripes, then fold it back and forth in sections about 2 cm deep.
Leave a small area at one end for a head. Glue on a rounded paper head, draw the eyes, and add a paper tongue if wanted. Stretch the accordion out slightly and place it on the table.
This snake bends along its folded body; it does not move on its own. Children can push and pull it gently for pretend play. A short snake is easier to control, while a longer one can be made by taping two strips together before folding.
If the head tips over, make it smaller or attach it to a wider unfolded end tab.
Turn Paper Strips into Something Bigger
Save long offcuts in a separate envelope. Strips are useful for loops, arches, chains, and weaving, so even a small collection can start several different projects.
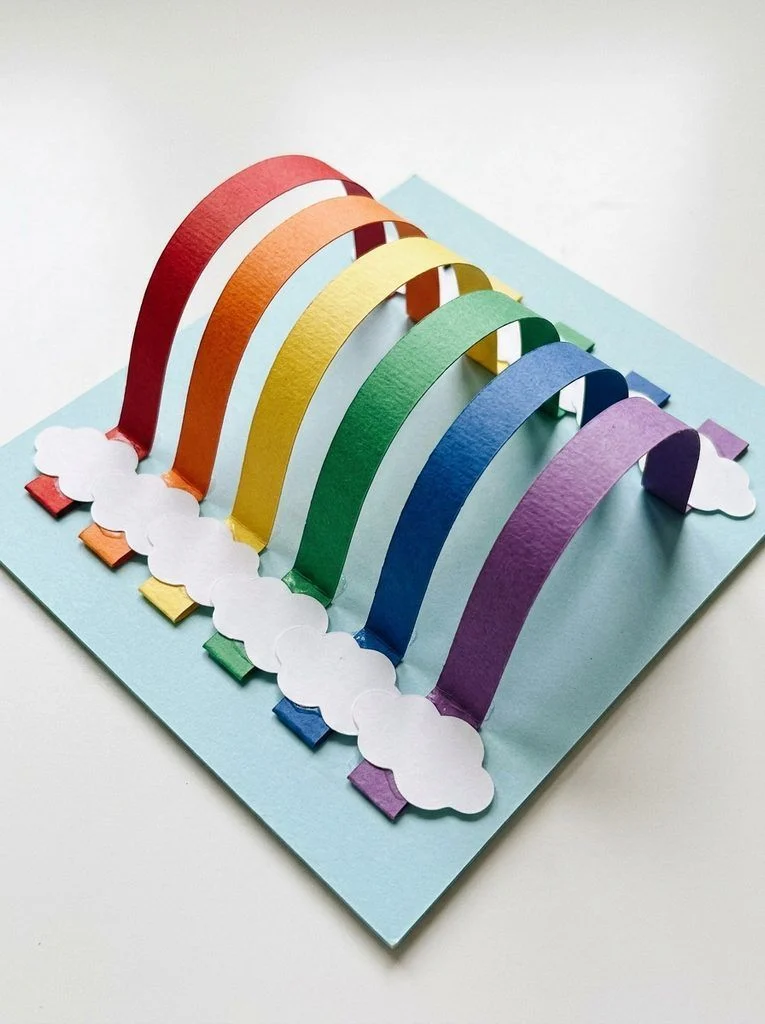
9. A Rainbow Bridge on a Card Base
Instead of joining a stack of rainbow bands at their ends, this version places separate arches next to one another across a base. It is a colorful paper bridge rather than a precise model of a rainbow.
Cut five or six strips about 2 cm wide and 18 cm long. Fold a 1 cm tab at both ends of each strip. On a piece of cardstock, mark two parallel lines approximately 10 cm apart.
Tape the tabs of the first strip along those opposite lines so the middle rises into an arch. Repeat with the remaining colors side by side. Cover the rows of tabs with two white paper cloud shapes if you want a neater base.
Try a shorter strip beside a longer one to see how the arch changes. If a strip flattens, bring its attachment points closer together or use slightly firmer paper.
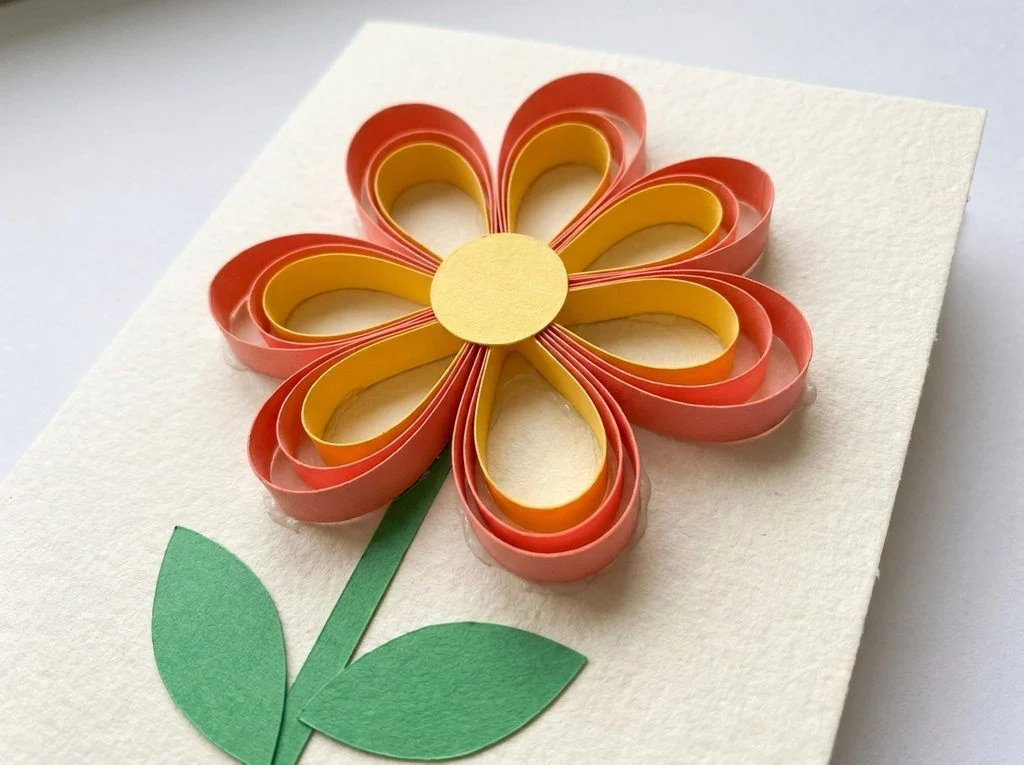
10. Loop-Petal Flowers for a Window-Ledge Picture
For one flower, cut six strips approximately 2 cm by 12 cm. Bring the ends of each strip together and glue them without flattening the rounded loop.
Glue those joined ends around a paper circle, pointing outward like petals. Cover the center with a second circle to hide the joins. Attach the flower to a cardstock background above a flat green stem and two leaves.
Make a picture with three flowers at different heights, or keep one large flower as the main feature. Two colors of petals can be alternated around the center.
The important part is to glue only the joined ends to the base. If the whole loop is pressed flat, the flower loses its raised shape. Let it dry lying down before displaying it upright.
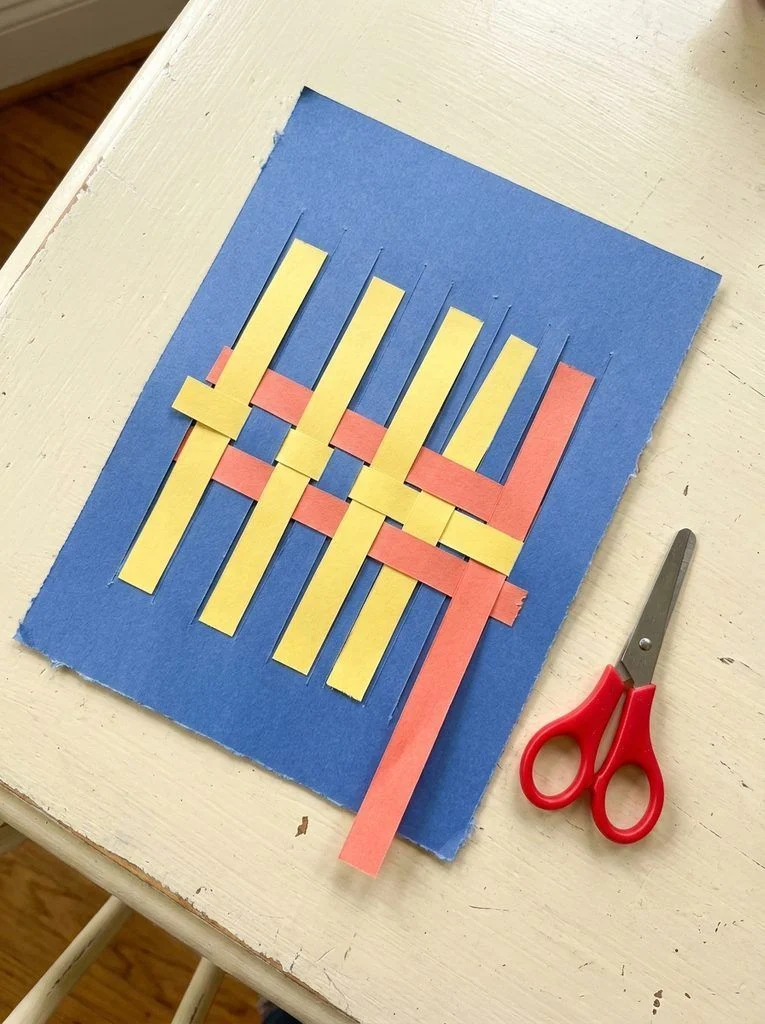
11. A Woven Paper Mat
Use a rectangle of construction paper about 20 by 15 cm for the base. Fold it in half so the two 15 cm edges meet. From the folded edge, cut evenly spaced slits toward the open edge, stopping about 2 cm before it. Unfold the sheet: it should have long slots with an intact border.
Cut contrasting strips a little longer than the width of the base. Weave the first over one band and under the next. Start the second strip underneath the first band, reversing the pattern. Continue, nudging the rows together without pulling hard.
Glue the loose strip ends to the border and trim the excess. The mat can become a background for a card or pretend picnic; it is a paper decoration, not a waterproof placemat.
If it feels fiddly: Make wider bands and use fewer strips. An adult can prepare the slotted base while a child chooses the color pattern.
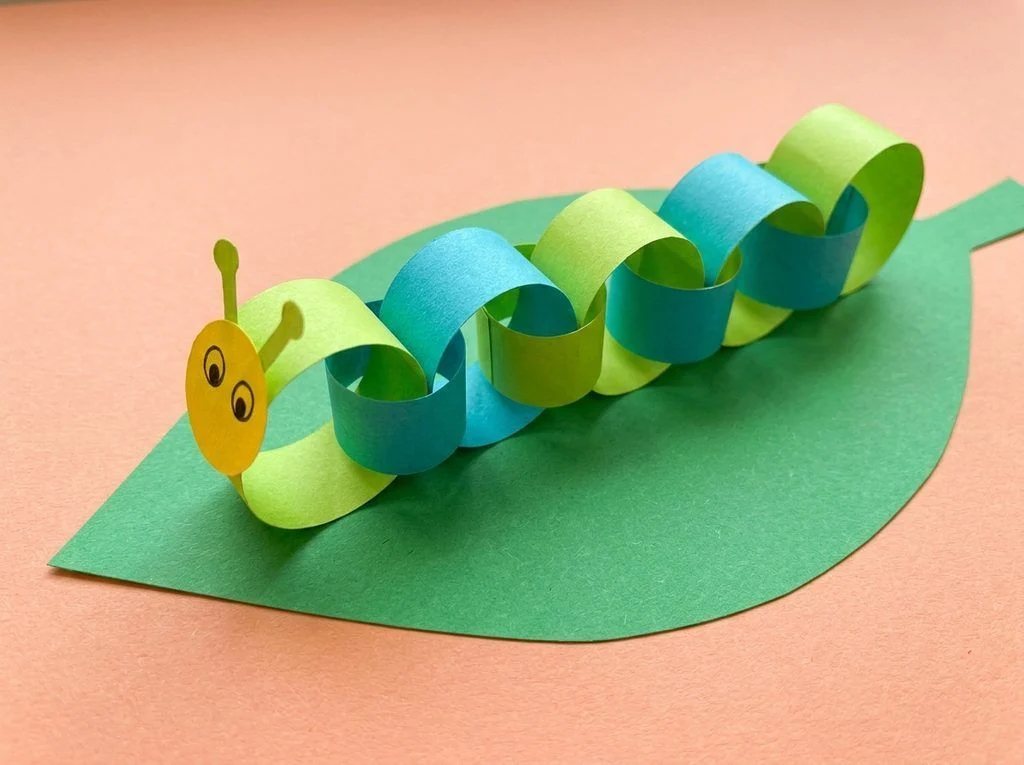
12. A Short Paper-Chain Caterpillar
Make a paper ring by overlapping and gluing the ends of a strip approximately 3 by 15 cm. Thread the next strip through the ring before closing it. Continue until you have five or six linked rings.
Glue a small face circle to the outside of the first ring and draw friendly eyes. Add two short paper antennae. Let the joins dry before lifting the caterpillar.
Alternating two colors makes a clear repeating pattern, while scraps produce a more mixed-up creature. Keep it short enough to play with on a table. You can also lay it on a large paper leaf for display.
If the links keep opening, use small pieces of tape to hold the overlaps instead of asking children to pinch wet glue for a long time.
Make Something That Has a Second Life
These projects are ready for a story, a gift, or a little pretend play once the glue has dried. Invite children to choose their own characters and colors.
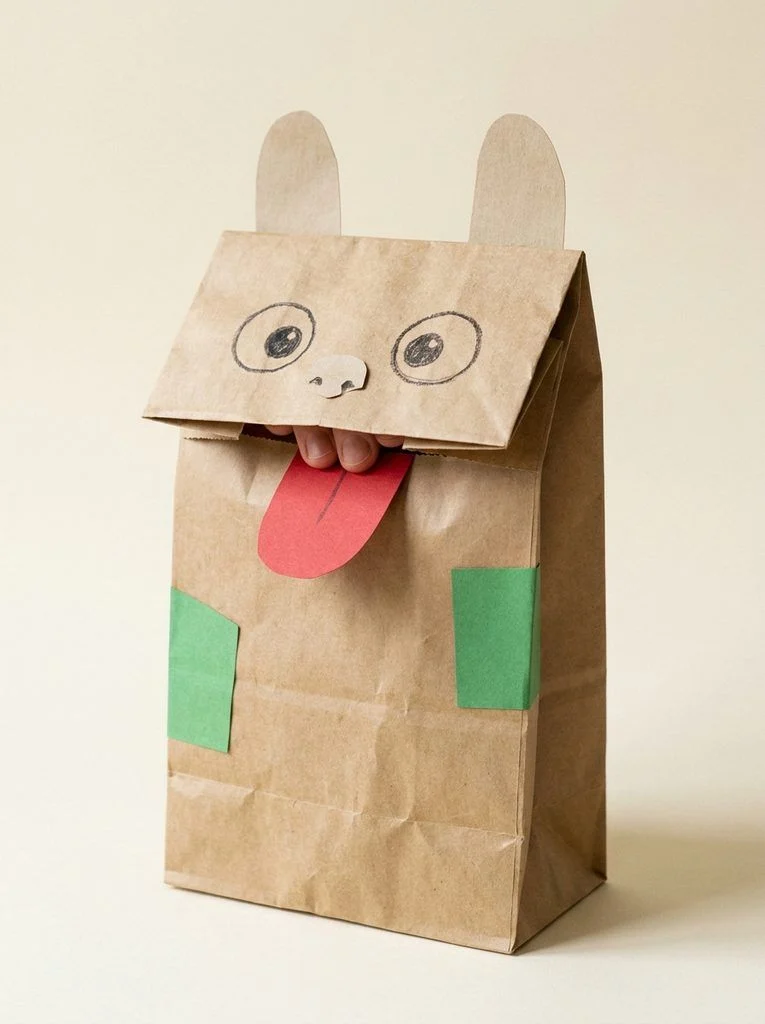
13. A Paper-Bag Puppet with a Moving Mouth
Use a clean, flat-bottomed paper lunch bag. Lay it flat with the folded bottom flap facing upward; that flap will become the top of the mouth.
Add eyes and a nose to the flap. Attach the lower mouth or tongue to the bag just beneath it, leaving the flap free to lift. Glue ears near the sides and decorate the body with paper clothing, fur shapes, or scales.
Once dry, slide a hand inside the open end of the bag and move the bottom flap to make the puppet talk. Test that movement before adding more decorations—paper glued across the hinge can stop the mouth opening.
The character does not have to be an animal. A sleepy cloud, polite monster, or talking sandwich can be just as entertaining.
14. A Crown Designed by Its Wearer
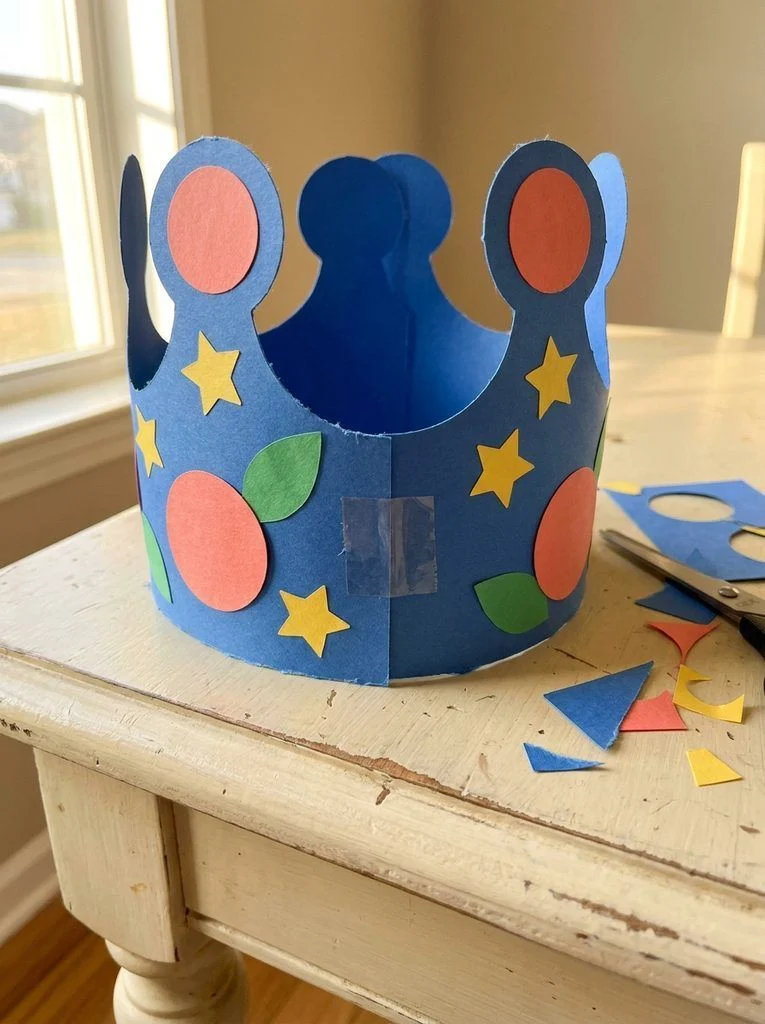
Cut two broad cardstock strips and tape them together end to end. Keep the bottom edge straight. Cut gentle points, waves, or a row of large rounded bumps along the upper edge.
Decorate the crown while it is still flat. Offer scraps, drawn stars, paper circles, or a favorite color combination. Large flat decorations are easier to attach than heavy stacked pieces.
Wrap it loosely around the child’s head, mark a comfortable overlap, then remove it to secure the join with tape. Check the fit again before play and keep the edge above the eyes. This crown uses no chin cord or exposed staples.
A crown can belong to a gardener, a space explorer, or the keeper of an imaginary library. Let the decoration suggest the character instead of choosing it for the child.
15. A Pop-Up Card with One Hidden Step
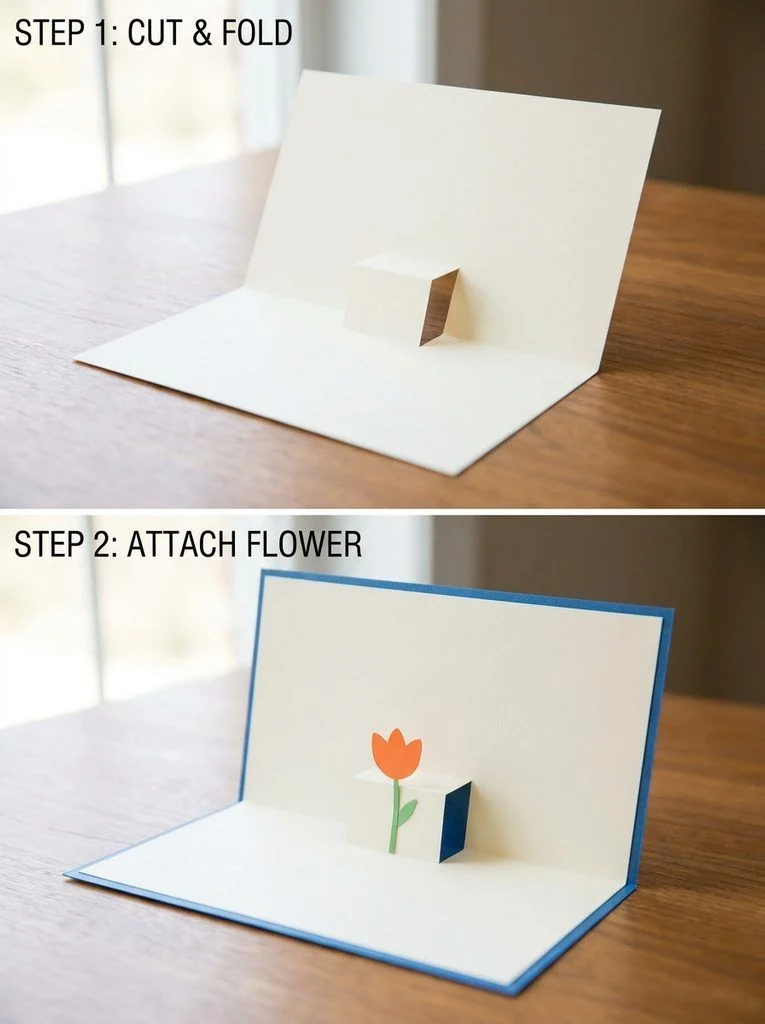
The mechanism is a small paper step cut into the card’s fold. Start with a piece of lightweight cardstock folded in half.
With the card closed, make two parallel cuts about 2 cm apart and 2 cm deep into the folded edge. Fold that narrow section backward and forward to crease it. Open the card, then gently push the section inward so it forms a step when the card is partly open.
Glue a small paper flower, cake, or character to the upright front face of the step. Keep glue away from the moving fold. Close the card slowly to check that the decoration fits inside without bending.
For a finished cover, glue the outside of this card into a slightly larger folded sheet, avoiding the cut-out mechanism. Decorate the front and add a message after everything moves freely.
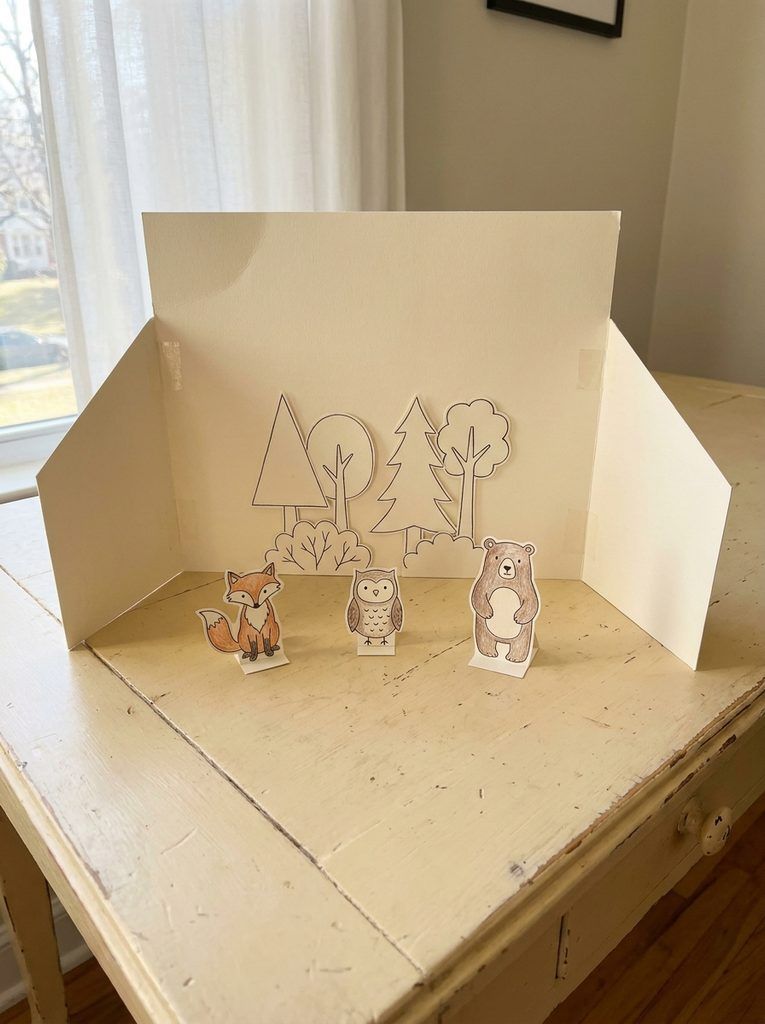
16. A Fold-Out Theater for Paper Characters
Take a wide rectangle of cardstock and fold each short end inward about a quarter of the total width. Stand the sheet up with the side panels angled slightly forward. The middle becomes a backdrop, and the side panels help it balance.
Draw or glue on scenery: a forest, underwater cave, moon base, or neighborhood street. Keep bulky decorations near the bottom so the backdrop stays steady.
For the cast, draw small characters on rectangles of cardstock, leaving a blank 2 cm strip at the bottom. Fold that strip backward into a standing foot. If a character falls, shorten it or make the foot deeper.
Now choose a beginning: someone has lost something, a visitor has arrived, or the characters need to cross a river. Children can move the figures by hand and fold the theater flat when the story is finished.
When the Paper Will Not Cooperate
Most craft problems can be solved by changing one small detail. Before starting again, check the paper, the amount of glue, and how much weight the join has to hold.
| What is happening? | What to try |
|---|---|
| The background goes wrinkly | Use less liquid glue, switch to a glue stick, or use firmer background card. |
| A fold keeps springing open | Try thinner paper and press the crease firmly against the table. |
| A loop will not stay attached | Flatten just the glued end, hold it briefly, and let it dry before moving the craft. |
| Weaving tears at the edge | Use wider bands and guide the strip through without pulling tightly. |
| Tissue leaves no color behind | Test tissue labeled for bleeding art; ordinary gift tissue may not release dye. |
| A pop-up card will not close | Reduce the decoration size and check that glue has not reached the moving fold. |
| A standing character tips over | Make the figure shorter or give it a deeper folded foot. |
Keep the Useful Scraps, Then Make Room to Play
Before clearing the table, separate long strips, large shapes, and tiny scraps. Store the useful pieces in an envelope or shallow box rather than mixing them into a pile that is difficult to search.
Let children choose which finished projects to display, give away, or keep for play. A bookmark can go straight into a book. The puppet can join the theater. The woven mat can become a pretend rug for a paper character.
Leave room for the unexpected result, too. A fan may turn into a peacock tail, and a paper town may become a map for an imaginary journey. The instructions get the project started; children can decide where it goes next.
More Paper Crafts for Kids and Craft Ideas
If your child enjoys these paper crafts for kids, use the category hub to find more paper-based projects and related hands-on ideas.
Browse the Paper Crafts category for more paper-based projects as they are added, or visit Kids Crafts for clay, seasonal, and other hands-on craft ideas.
Paper crafts for kids work best when the setup stays simple and children have room to experiment. Pick one project, use what you already have, and let the finished result become part of play, display, or gifting.
